Automate your Processes Easily with Power Automate
With the Microsoft Power Automate workflow tool for Dynamics 365 Business Central, you can automate regular, recurring processes. Free your team from tedious routine tasks. We’ll show you how!
Automate routine tasks and save valuable time
Reduce errors through standardized, digital workflows
Integrate processes seamlessly into your Microsoft environment
Tiresome Routine Tasks Are
Your Challenge without Power Automate
Recurring routine tasks take up a lot of time. That’s annoying and nobody needs that. In addition, careless mistakes can easily be made under stress, resulting in even more work. Finally, it can quickly become frustrating for employees to only have to complete repetitive and tedious tasks. Don’t let that happen.
More Time, fewer Errors and more Satisfaction
through the Solution: Power Automate
What is Power Automate? Microsoft Power Automate (formerly Flow) is a practical workflow tool that allows you to easily automate routine, repetitive tasks into workflows. These workflows can range from simple tasks (e.g., notifications) to comprehensive systems (e.g., complex approval processes). You can create any logic that should be automatically executed based on certain events. And the best part: you don’t need any programming skills.
You are currently viewing a placeholder content from YouTube. To access the actual content, click the button below. Please note that doing so will share data with third-party providers.
By using the robotic process automation (RPA) of Power Automate, you can partially or entirely free your team from routine tasks. Software bots are trained to perform the labor-intensive, repetitive, manual tasks. Two types are distinguished:
Attended RPA (partial automation): Human intervention is necessary to trigger actions or reactions
Unattended RPA (full automation): No human intervention is required
Note: Let Microsoft Copilot take care of routine tasks! This is integrated into the Power Platform and supports you in the creation of flows. Simply describe what you need, have changes made to your flow or have questions about your flow answered. The copilot will help you.
Excellent Workflows – Why You need Power Automate:
These Are Your Benefits
For Non-Techies
The creation of workflows does not require any programming or programming knowledge.
Variety of Connectors
In a Power Automate workflow, you can easily link numerous connectors together.
Multi-Stage Process
With Power Automate, you can link multiple tasks into an event-driven workflow.
Something for Everyone:
4 Types of Power Automate Workflows
In just a few clicks, you can create your workflows either from an empty flow app based on a connector (list of connectors) or from one of Microsoft’s many templates. You also only need to specify once which services should communicate with each other.
Automated Flows
Create event-driven flows in Microsoft Power Automate to create workflows that automatically execute one or more tasks after they are triggered by an event.
Planned Flows
Create a flow in Power Automate that executes one or more tasks (e.g., report by email) at a specific time. On a specified date or after a number of days.
Business Process Flows
Create a business process flow in Power Automate, which allows you to define sequences of steps that people need to perform to achieve a desired result (example: order processing).
Button Flows
Create a button flow in Power Automate that allows you to easily execute tasks anytime/anywhere from your mobile device (example: button that sends email to group of people).
Decision made easy:
anaptis takes You to the next Level!
Why Power Automate for your business? With anaptis by your side, you have a reliable Microsoft partner and trustworthy Power Automate consulting. We provide you with an overview of what makes us unique.
Why anaptis? Discover the advantages that will make your heart beat faster:
We prefer a standard-based software approach and first assess if a requirement can be solved with the standard. This is how we ensure that you remain independent and Update-capable!
Our unique project methodology is structured but flexible – with maximum transparency, minimum costs, interactive workshops instead of specifications and comprehensible communication without technical jargon.
We deliberately opt for a standard-based ERP solution that can be flexibly adapted to different industries, and we draw on our more than 20 years of project experience across a wide range of sectors to efficiently apply proven best practices—delivering well-thought-out solutions rather than isolated ones.
We are constantly evolving and strategically leveraging modern technologies such as Microsoft Copilot to streamline processes—always guided by the belief that AI supports people, but that experience, entrepreneurial thinking, and the final decision remain in human hands.
The Perfect Match?
Is Power Automate suitable for my Company?
Power Automate is designed for medium-sized businesses across various industries. Increase your efficiency and create semi-automated workflows for your business with Power Automate.
Do you still have doubts? Feel free to reach out to us, and we will explore together how you can automate your processes with Power Automate!
From Theory to Practice:
Tutorial: The Power Automate Business Central Integration
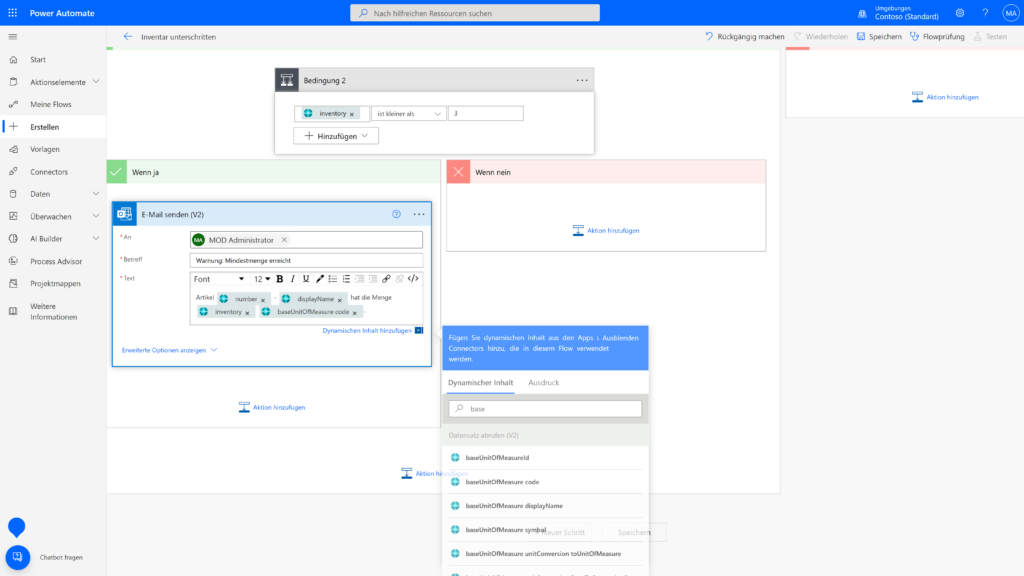
In this short tutorial, we will create a simple flow that executes an action when the stock for a particular item falls below a certain quantity. In our example, the action is to send an email.
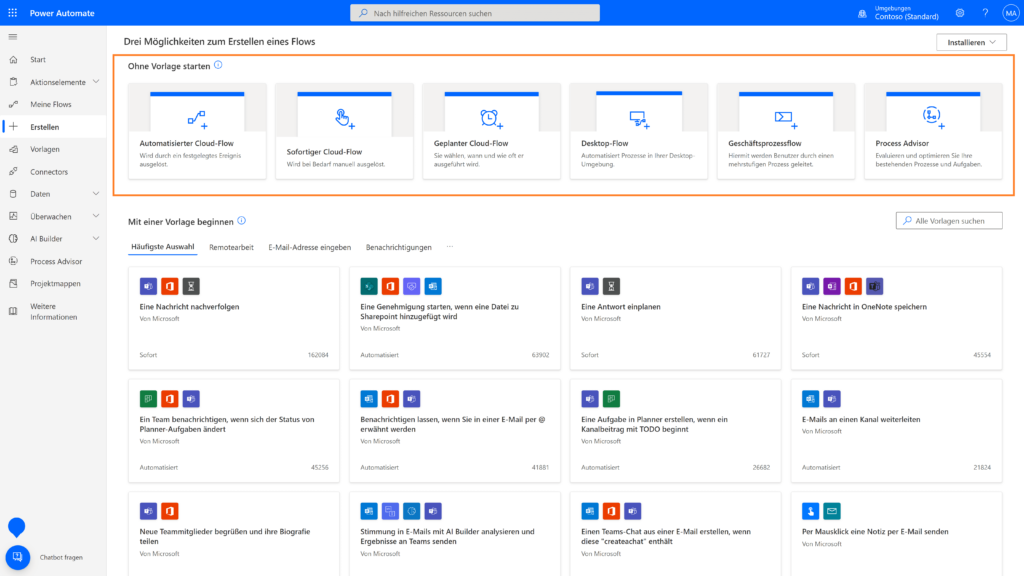
Call up Power Automate and select Create new flow.
Alternatively, you can open a page in Dynamics 365 Business Central. Use the three dots to select the option Automate > Power Automate > Create flow. At this point, you will be directed to Power Automate to create a new flow.
In our tutorial, we take the first route via Power Automate. Either way, select the option to create a flow without a template.
Search for “Business Central” and select the action Retrieve record.
In this step, fill in the Environment name, Company name and Table name fields again. In addition, select “Row ID” in the Number ID field by selecting dynamic content.
Now save the flow you have created. Your created flow is automatically tested in the flow check and any problems that occur are displayed. Note: In this example, it is sufficient to define the “If yes” conditions, as nothing should happen if the conditions are not met.
Power Automate Examples:
Examples from Practice for Power Automate for Dynamics 365 Business Central
Power Automate for Dynamics 365 Business Central can be used for a wide variety of scenarios. We have put together some Microsoft Power Automate examples for you, in which you will certainly recognize yourself with your wishes:
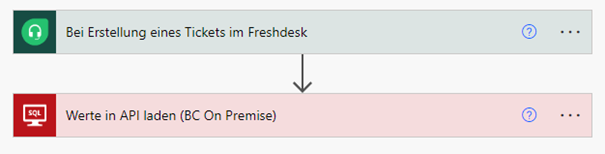
Requirement of the customer: When entering an invoiced time in time recording, the effort estimate should be displayed to enable a comparison between actual and target effort.
Solution: In Power Automate, the tickets can be called up in Freshdesk using an OpenAPI with the relevant information and loaded into an API in Business Central. This API is linked to the time recording via a development and the actual and target effort is displayed in a field whenever the corresponding ticket is entered.
Effort estimation of Freshdesk tickets in Business Central (time recording) with Power Automate
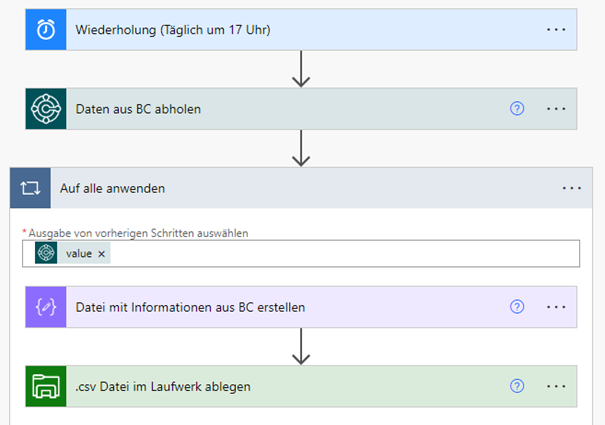
Requirement of the customer: At the end of each working day, the shipping service provider requires a file in CSV format with all shipments containing information such as delivery address, weight, etc.
Solution: The data is provided in Business Central in an API for Power Automate. It is then retrieved using Power Automate and saved in a CSV file. This is automatically sent to the shipping service provider by email every day.
Creation of Excel, csv, PDF files (etc.) via the flow with file storage in the cloud or local servers
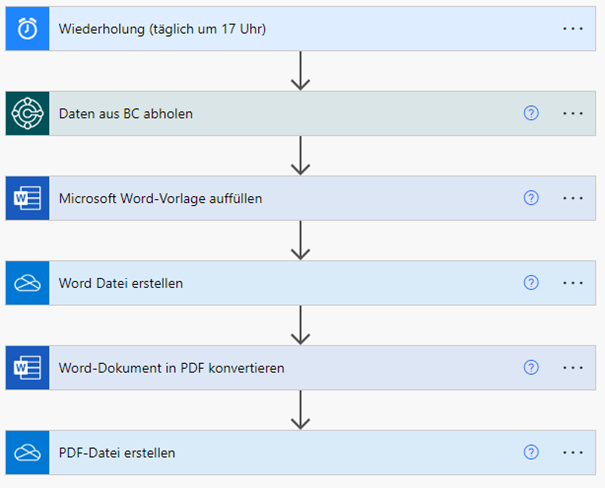
Requirement of the customer: The shipping service provider requires a document that is handed over to the driver with the goods and contains the shipment information including the hazardous substances.
Solution: A Word file containing placeholders is created and stored in an accessible location for the flow (e.g. OneDrive). The placeholders in the file are then filled with data from Business Central and the file is converted to PDF format.
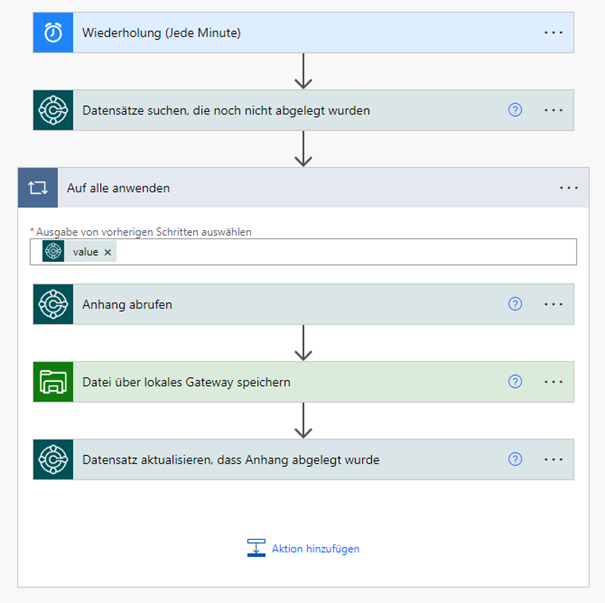
Requirement of the customer: Documents created from Business Central are to be transferred to a local server in PDF format.
Solution: All documents that are posted in Business Central are recorded in an intermediate table including the PDF attachment. The Power Automate Flow goes through this table at a certain interval and retrieves all documents that have not yet been transferred. Using an action, it can retrieve the document in Business Central and save a file on the server with the file content of the attachment.
Transfer of invoice documents to an SFTP server in Power Automate
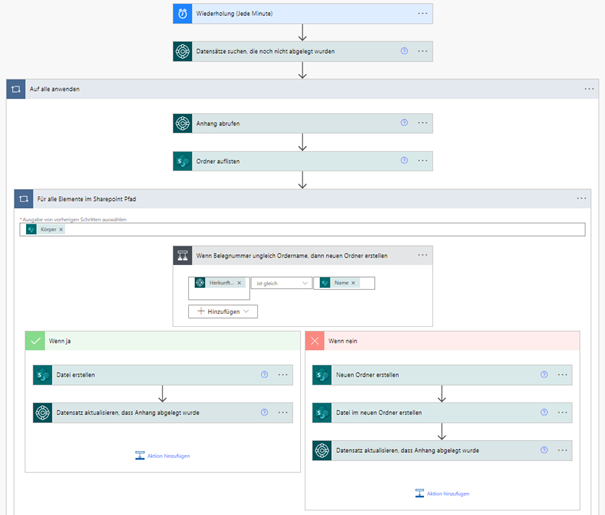
Requirement of the customer: The posted documents from Business Central are to be transferred to SharePoint and saved in the customer folder provided for this purpose.
Solution: Each time the Power Automate flow is executed, the SharePoint directory is checked to see whether a customer folder already exists for the document to be saved. If this is not the case, a new folder is automatically created and the document is saved in the corresponding folder.
Automatic document storage in SharePoint with Power Automate
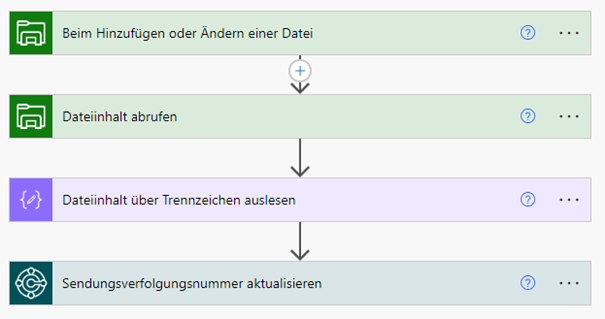
Requirement of the customer: The shipping service provider stores a file in CSV format with shipment information on a local server that is to be processed in Business Central.
Solution: The flow is triggered when a new file is saved in the folder on the local server. The flow can read the information via the separator in the file and save the data in an intermediate table in Business Central, which is then processed further in other tables.
Read files from a storage location and import them into Business Central with Power Automate
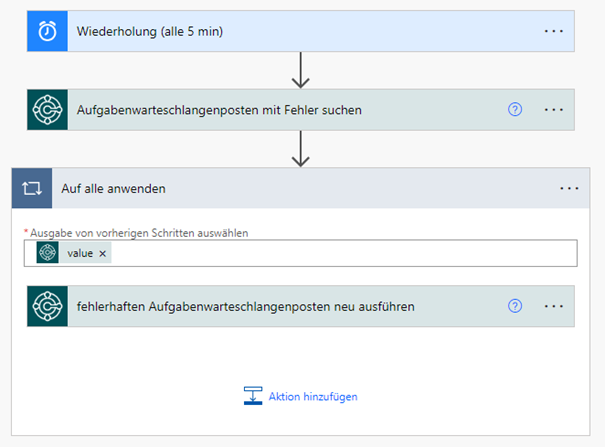
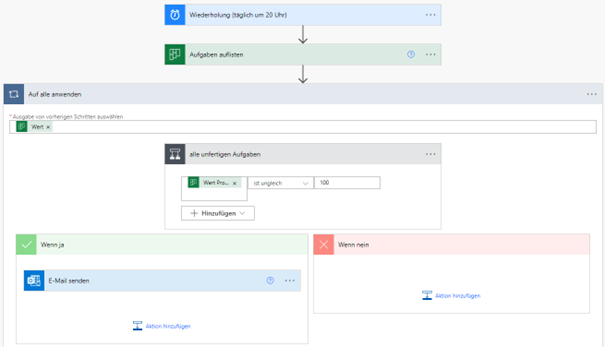
Requirement of the customer: Task queues that have generated an error message should be restarted automatically via a flow.
Solution: The flow examines all erroneous task queue items at a certain interval and repeats them. If an error occurs again, a mail with the error code and the description of the task queue is sent to a responsible person.
Restart of faulty task queue items in Power Automate
Requirement of the customer: Assembly orders are to be organized with the help of Microsoft Planner.
Solution: The assembly orders from Business Central are transferred to Microsoft Planner with information such as quantity, article, a link to Business Central or the document attachment. The tasks are grouped according to customers, which are automatically created when a new customer is added. When the task is completed, the flow automatically archives the information in a SharePoint list.
Requirement of the customer: The outstanding Planner tasks are to be sent to employees by e-mail.
Solution: The flow checks at a certain time interval whether there are any incomplete tasks in the team’s Planner and then sends them with all the information to the employee concerned.
Transfer tasks from Microsoft Planner to Outlook with Power Automate
Requirement of the customer: Attachments of emails arriving from certain customers should be saved in the respective customer folder.
Solution: The flow can be triggered whenever an email arrives in an Outlook mailbox. The email can then be read with the customer’s email address and matched with the information from Business Central in order to assign the customer folder in OneDrive. The attachment can be retrieved automatically and could be filtered by file name if required.
Requirement from the 1st customer: An email should be sent to the sales department when a customer is blocked in Dynamics 365 Business Central.
Requirement from the 2nd customer: An email should be sent to the customer when a sales price is changed.
Requirement from the 3rd customer: When sending a sales order, information about the delivery and tracking number should be provided.
Solution: Provision of an API with the relevant information in Business Central so that Power Automate can retrieve the data. Then simply create an e-mail action that is filled with the data from the API.
With the help of Microsoft Power Automate (formerly Microsoft Flow), you can automate regular, recurring processes and routine tasks easily and conveniently using workflows. Workflows range from individual tasks (e.g., notifications) to extensive systems (e.g., complex approval processes). And the best thing about it: you don’t need any programming knowledge (low-code application). In just a few clicks, you can create your workflows either from an empty Flow app based on a connector (list of connectors) or from one of the many Microsoft templates.
Microsoft Power Automate free enables limited testing of Power Automate. Every user can test Power Automate Free for 90 days. The service is free of charge. This means that there are no fees for the licenses.
You can try Power Automate for free for 90 days. The cost of Power Automate thereafter depends on whether you choose to license the product per user or per flow, and on the duration of your subscription (annual or monthly). You can find the prices for these options on our Prices page.
Let’s say you want to create a simple flow that executes an action when the stock for a particular item falls below a certain quantity. The action to be triggered would be to send an email. Here we go:
Access Power Automate and select Create a new flow. Alternatively, in Dynamics 365 Business Central, navigate to a page. Select Automate > Power Automate > Create flow from the three dots menu. At this point, you will be redirected to Power Automate to create a new flow. You can choose to create a flow without a template.
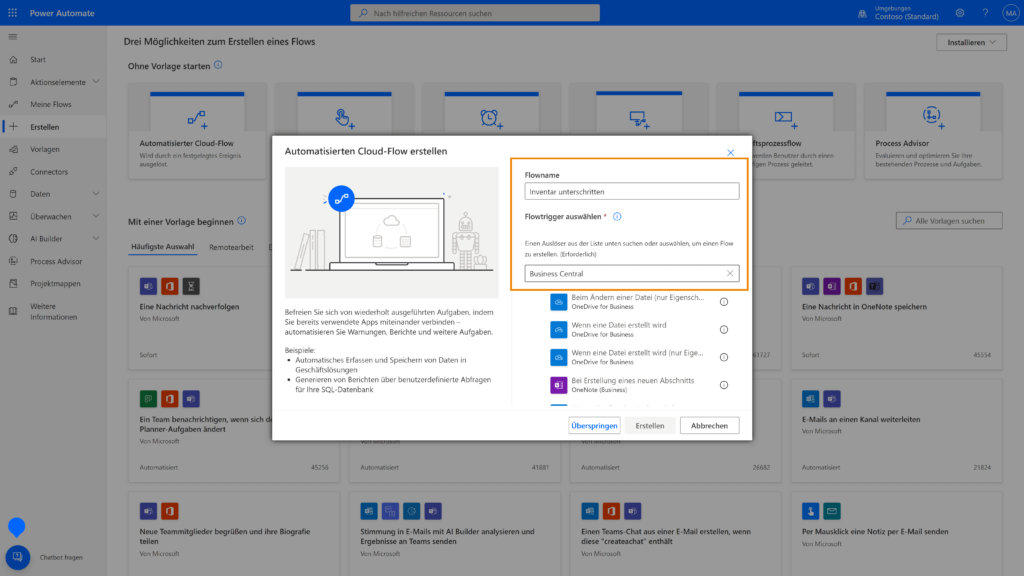
Assign a name to the flow.
Search for available triggers by searching for “Business Central” and select the trigger “When a record is modified”.
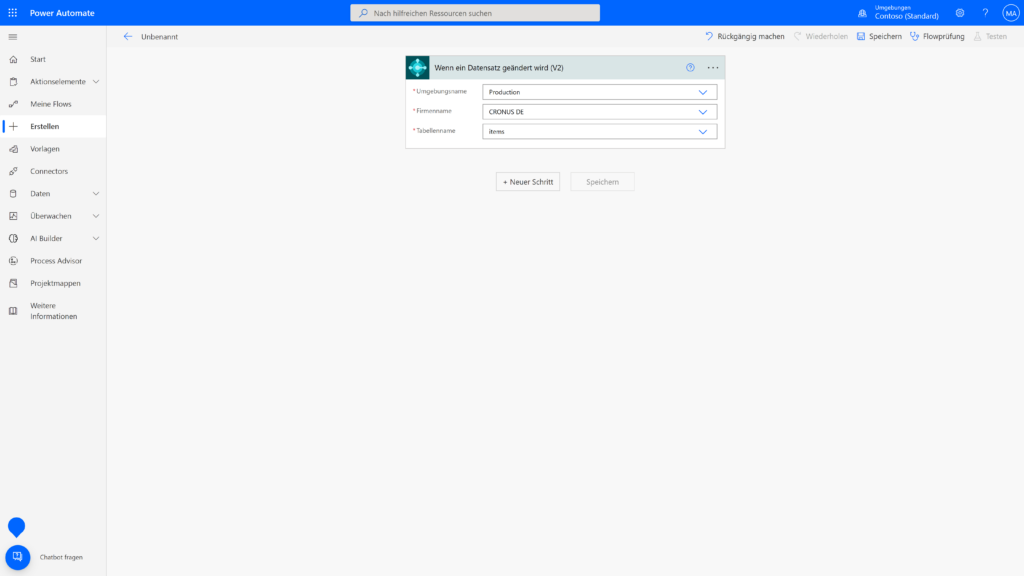
Next, choose the Environment name (default is “Production”) and your company. Select your company from the dropdown list.
Now select the table. Since we want to check our inventory, we would need to choose the option “items” in the Table name field.
Then, you can add an action by clicking the + New step command.
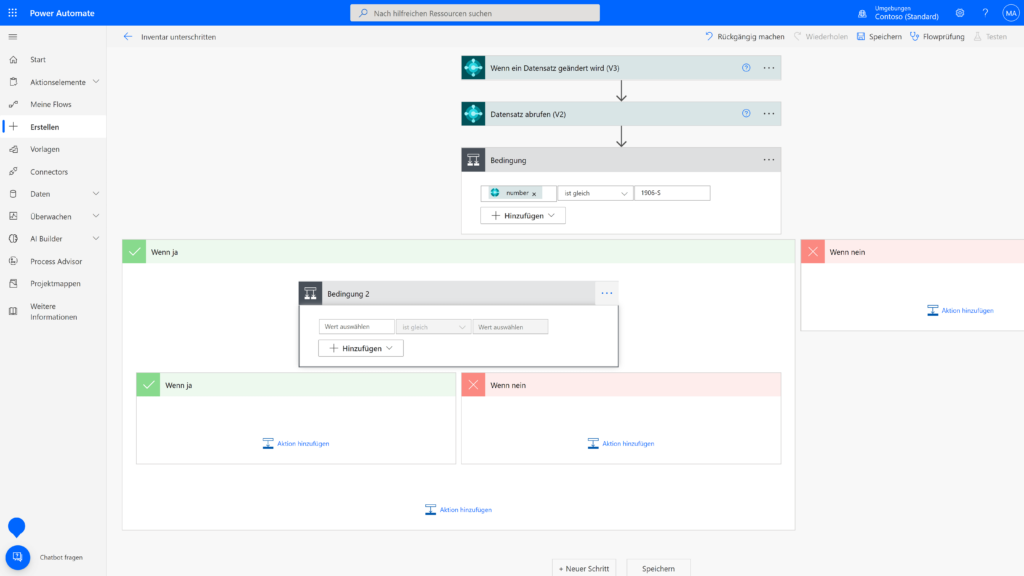
Continue by searching for “Business Central” and selecting the action Get record. In this step, fill in the Environment name, Company name, and Table name fields again. Additionally, in the Record number field, choose “Row ID” from the dynamic content selection.
Now, you can also define additional actions. In this step, we will also set the condition to trigger the action. Select Control > Condition as the action.
Next, you can design the email to be sent, utilizing the suggested dynamic content.
Finally, save the created flow. In the flow checker, your created flow will be automatically tested, and any issues that arise will be displayed.
Note: In this example, it is sufficient to define the “Yes” conditions, as nothing should happen if the conditions are not met.
Let’s assume you want to create a flow to automatically create sales orders in Microsoft Dynamics 365 Business Central as tasks in Planner. You can see how this works in the following video:
You are currently viewing a placeholder content from YouTube. To access the actual content, click the button below. Please note that doing so will share data with third-party providers.
Power Automate enables the automation of repetitive tasks related to Excel, simplifies data management, and seamlessly integrates Excel into complex business processes. For example, you can retrieve data from Excel and also input your own data into Excel. Additionally, there is the option to link this data with other topics as needed.
Get to know us! In a free initial consultation, we’ll determine together if we, as a partner company, and the ERP system for medium-sized businesses, are the right solution for you and your company.
 loading="eager" alt="microsoft-power-automate">